top of page

How to install a 15k BTU air conditioner on an RV

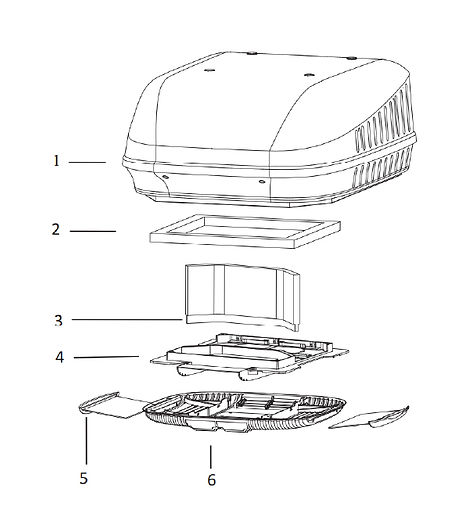
This is a guide for installing and maintaining the 15k RV AC and heat pump unit from RecPro. All of the info below is from the appliance manual and formatted into a mobile friendly view. This SKU number for this AC is RP-AC3800-P and this model includes a condensate pump.


Diagram showing wiring and terminal block connections for a ducted RV air conditioner

How to connect power to a ducted RV air conditioner

Connect the RV air conditioner to a dedicated circuit that meets local wiring codes. Locate the power cord inside the RV and securely connect the active, neutral, and ground wires to prevent shorts or overheating.

Diagram showing how to connect the control cable and attach the plenum assembly to the mounting bracket during RV air conditioner installation.

How do you install the plenum assembly for an RV air conditioner?

Connect the control cable between the rooftop unit and the plenum assembly, matching the wire colors. Then attach the plenum to its mounting bracket, secure it with the provided screws, and reinstall the return air filters to finish the installation.

Diagram showing the plenum mounting bracket and metal clamping bars being installed to connect the indoor and outdoor RV air conditioner units.

How do you install a plenum mounting bracket?

To install the plenum mounting bracket, align the M8 bolts with washers and metal clamping bars through the four corner holes. Push the bracket upward into the square roof opening and tighten the bolts evenly until the bracket is secure and fully seated.

RV air conditioner diagram showing how to position the outdoor unit over the roof gasket and square opening.

How is an RV air conditioner ALIGNED on the roof?

Place the outdoor AC unit over the roof opening and gasket, making sure the four mounting bolts align with the corners of the 14 ¾ × 14 ¾-inch hole. Set it down gently without sliding to avoid damaging the gasket or causing air and water leaks.

Diagram showing correct RV air conditioner placement facing travel direction, centered on the roof with required clearance for airflow.

How should an air conditioner be POSITIONED on an RV roof?

The air conditioner should be centered on the roof and installed facing the same direction your RV travels. Leave at least 6 inches of clearance on each side, 8 inches at the front and back, and 2 inches of height space for proper airflow.

A diagram of the parts related to installing the ducted RV air conditioning unit.

What comes with a ducted air conditioning unit?

The ducted air conditioning system comes with the outdoor unit, plenum assembly, filters, and all the hardware needed for installation. Optional accessories like a remote or wall controller may also be included depending on the setup.

Diagram showing how to measure and install the air flow separation baffle in a ducted RV air conditioner

What is the air flow separation baffle in a ducted RV air conditioner?

The air flow separation baffle is a divider that keeps the cold air supply and warm air return separated inside a ducted RV air conditioner. It needs to be trimmed to the ceiling height and inserted into the plenum bracket slot to direct airflow correctly.

Diagram showing RV air conditioner power connection with 3-pole terminal block for active, neutral, and ground wires.

How do you connect power to an RV air conditioner?

Connect the RV air conditioner to a dedicated power circuit that can be shut off and meets local wiring codes. Inside the RV, locate the power cord and connect the active, neutral, and ground wires securely to prevent loose connections or shorts.

Illustration showing how to attach the outlet air duct to the bottom of an RV air conditioner using truss head screws from inside the vehicle.

How do you attach an outlet air duct on an RV air conditioner?

Attach the outlet air duct to the base of the outdoor RV air conditioner from inside the vehicle using four truss head screws. Make sure the duct is positioned with the correct side facing down and that the markings for direction are aligned before tightening the screws.

Diagram showing self-leveling RV roof sealant applied in a closed circle around the air conditioner gasket to prevent roof leaks

How should an AC unit be SEALED on the RV roof?

Apply the self-leveling RV roof sealant in a continuous ring around the roof opening before mounting the unit. If your model doesn’t include a pre-installed outlet gasket, attach it to the roof first, press it down firmly, and then seal around it to prevent leaks.

Diagram showing wooden support blocks around a 14¾-inch roof opening for RV air conditioner installation, reinforcing the roof to prevent crushing and air leaks.

What are the RV load bearing requirements an AC unit?

The RV roof must be strong enough to hold 88 pounds and remain level without collecting water. Around the 14 ¾-inch opening, wood framing at least ¾ inch thick should be added to support the air conditioner and prevent roof crush.

This is a diagram image of the contents of the package layered in order of assembly.

What comes in the box with an AC heat pump unit?

The box includes the main outdoor air-conditioning unit, the plenum assembly for inside the RV, and all necessary mounting hardware and filters. Everything needed for a standard installation, bolts, brackets, gaskets, and screws, is included.

bottom of page